Learn more about how the Cal Poly Humboldt Library can help
support your research and learning needs.

Stay updated at Campus Ready.

Skip to Main Content

Creating Video Projects

Shooting and editing video and borrowing cameras and other gear.

Borrow Cameras, Mics & More!

Library Makerspace Take & Make

The Cal Poly Humboldt Library has equipment for you to check out for free! You can borrow anything for three days and can grab multiple items, including DSLR cameras, camcorders, GoPro cameras, tripods, digital audio recorders, microphones and more. You can ask for any of these items at the Checkout desk on the first floor.

If you have any questions about equipment, or other aspects of a digital project, we are happy to help! Contact us (the Makerspace) at makerspace@humboldt.edu.

Insta360 Flow Gimbal

Line drawing of the Insta360 Flow with a smartphone clamped to it and positioned upright with the folding tripod fully extended and set up.

This smartphone stabilizer is great for action and sports filming as well as for any purpose where you want the camera to track (follow) a person. This makes it great for shooting smooth action shots like snowboarding or hiking as well as for vlogging and similar videos where you need an extra hand to move the camera. The Flow will track you or the person you’re filming with high accuracy and smooth panning.

Can I check one out now?

What you need to get started

This gimbal works with smartphones, so you will need a compatible phone (view the tested list of phones). If your phone can download and install the Insta360 app, it will almost certainly at least work with the Flow's basic features.

  • You may need to remove your case if it cannot fit within the clamp.
  • Follow these basic tips to get the phone securely attached to the Flow (see the video below for a demonstration):
    • Place the phone within the clamp so that the phone is oriented with the writing on the clamp.
    • Be sure to securely attach the magnetic clamp to the Flow. The lip on the attachment point should be oriented with the groove on the clamp.

How do I use this thing?!

Luckily, once you connect the Flow to your phone using the Insta360 app, it provides an in-app tutorial with step-by-step instructions on how to use the gimbal and control your phone's camera with the Flow's controls.

You may also want to view the online instructions from Insta360, including using it for the first time, basic operations, and how to use the app. You can also skip to the video below for a run down of all of features and how to access and control them.

Basic Instructions & Features

There are a lot of features and you may not need them all, so don't be afraid to start playing around with it once you have learned some of the functions that look interesting. A couple of the more useful features are:
Tracking for vlogging or filming yourself

  • Switch the camera to selfie mode (so you can see the screen) by pressing the switch button once (the switch button is the two curved arrows forming a circle on the right side of the black control panel on the handle).
    • Quickly press and release the trigger button and the gimbal will automatically recognize your face and start tracking.
    • If you want to track a specific object, you can tap your screen and drag your finger to draw a box around the object you want to track. Once you are done dragging, the gimbal will start tracking that object.
    • To stop tracking, tap the screen or quick press the trigger once.
    • To re-center the gimbal, press the trigger two times.

Use the selfie stick to remotely control the camera.

  • Press the red record button to shoot a photo or start/stop recording video.
  • Press the switch button to switch between selfie and back camera.
  • Press the trigger three times to flip the phone around so that the back camera lenses are filming you (and the screen will be facing away).
  • Gimbal rotation: when using the back-facing cameras, you can control which planes of movement the gimbal will move within. To switch between modes, slide your finger in a circular motion around the black control panel where the buttons are located. To fully understand the axis of rotation that each of these control, you may want to watch the demo video below.
    • Auto: automatically selects the best mode for the type of shot.
    • F (Follow mode): the gimbal will pan side to side (yaw axis) and rotate up and down (pitch axis).
    • PF (Pan Follow mode): the gimbal will only pan side to side.
    • FPV: the gimbal allows for rotations and you can rotate the camera through the roll axis using the gray wheel surrounding the control panel.
    • When using tracking, you cannot rotate the camera using the wheel. The gimbal's tracking will keep the subject in frame and oriented correctly.

Use the more advanced app features:

  • Hand gesture controls
    • You can active the hand gesture controls to start/stop the shutter and tracking without touching your phone or the gimbal controls -- you just need to be in the frame! To activate, tap the hand icon at the top of the screen before you start recording. The hand with the camera icon is the start/stop gesture control and the hand with the camera and frame icon is the start/stop and tracking control.
    • Gesture controls work best if you are within 2 meters (6 feet) of the camera, but can work from much further away -- test it out for yourself!
  • Shot Genie
    • The green clapboard with microphone icon in the upper left corner opens a library of video clips with tips on how to shoot similar scenes. Use this for inspiration or to learn about filming. To activate, tap the icon and then speak to search for a type of shot or how to shoot a particular location, try: "I'm in the library" or "shooting under a tree."
  • As a power bank
    • Use the included cables (USB-C and lightning) to charge your phone from the Flow's battery. Plug in your phone and then to the Flow's port next to the phone clamp, marked "OUT."

Video Tutorial

Cell Phone Recording Kit

Smartphone tripod

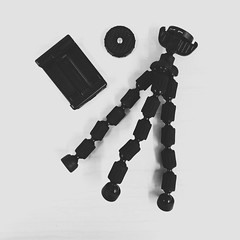
The cell phone recording kit is a simple way to improve the projects you create with your smartphone. The tripod mount will hold phones up to 3.4" wide (including many plus-sized phones like the iPhone 8 Plus and Samsung Galaxy S8+). If the exceptionally flexible Vivitar SP6 spider tripod isn't up to your project, the mount will fit onto any standard tripod.

Can I check one out now?

What you need to get started

The simple kit is fairly straightforward, but remember:

  • The mount will work with most tripods, including all of our larger options.
  • This kit will work with all of our cameras and digital recorders.

How do I use this thing?!

Simply thread the camera mount to the tripod to get started. You can adjust the spider legs in many positions, even wrapping it around like a hook to get those really awkward shots.

Untitled Smartphone tripod

Vanguard Tripod

Vanguard Alta Pro 263AT Tripod

This professional-quality tripod is great for stabilizing your shots with the Nikon or Canon cameras. The flexibility of the base allows for a wide range of options to cover any terrain. Also compatible with the GoPros and Insta360 One X.

Can I check one out now?

What you need to get started

This one is simple! All you need is a camera to attach to it.

  • The tripod uses a standard quick release mount and camera mount threading.
  • Great for still photos or video footage.
  • Compatible with GoPro or 360fly when using the threaded mounts which come with those cameras.

How do I use this thing?!

Manfrotto Compact Action Tripod

Manfrotto Compact Action Tripod

The Manfrotto Compact Action Tripod is a compact but professional-quality tripod with a grip head for panning video and stabilizing your shots. It is compatible with the Canon Vixia camcorders as well as our DSLR and GoPro cameras (with threaded tripod mount). The small size is big enough for almost any job (at 5.5 feet), but makes it easy to travel with and pack for a hike (or just lower the weight of the things you're lugging around).

[Pictured with the Canon Vixia R800 camcorder available separately.]

Can I check one out now?

What you need to get started

This one is simple! All you need is a camera to attach to it.

  • The tripod uses a non-standard quick release mount but it is still easy to use and has the standard tripod threading.
  • Primarily a photography tripod, this has some video-friendly features as well. The grip handle and ball head allow you to swivel for smooth panning and tilting. Setting the tripod to video mode locks the ball head so that you can only pan and tilt, while the photo mode allows full 360-degree movement (see video below for demonstration).
  • Compatible with all of our cameras. If you plan to use this with a GoPro, let us know so we can be sure to include the threaded mount.

How do I use this thing?!


How to use the unique quick release 'plate' system to attach your camera or recorder to the tripod. (Best Compact Manfrotto Tripod, Buenos Diaz Imagery)

How to use the ball head and video or photo features for panning and tilting. (Manfrotto Compact Action | BEST TRAVEL TRIPOD?, Mamo Air)
GoPro Accessory Mounts

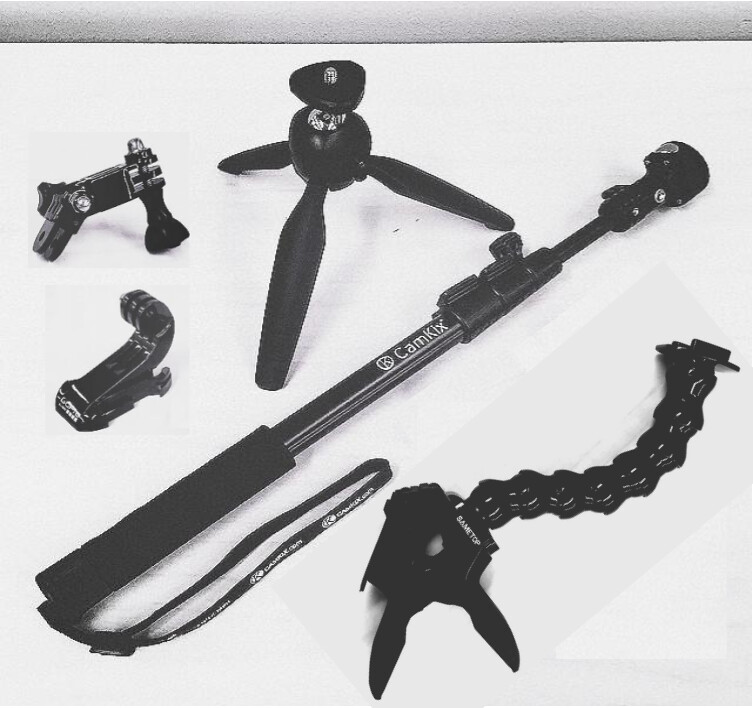
GoPro accessory mounts, Camkix 3 in 1 tripod and Sametop gooseneck mount

The Camkix 3 in 1 tripod kit includes the tripod base and telescoping pole as well as various GoPro mounts and a gooseneck mount.

Can I check one out now?

What you need to get started

This one is simple! All you need is a camera or smartphone to attach to it. The smartphone attachment fits a variety of phone widths, from 2-3.5 inches.
How do I use this thing?!

GoPro Strap Mount

Polar Pro GoPro Strap Mount

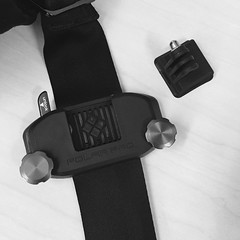
The Polar Pro GoPro strap mount lets you attach any camera with a GoPro adapter (including our Hero6 and 360fly cameras) to your bag, belt, or anything with a strap. This is a very secure way to attach a camera to your body during almost any activity. Be sure that the camera mount is fully threaded on and that the mount's quick release is in the lock position.

Can I check one out now?

What you need to get started

This one is simple! All you need is a camera or smartphone to attach to it. Attach the mount to any strap by unscrewing the two plates, insert the strap between them and then screw the plates back together. 

How do I use this thing?!

How can I check out and return items at the Library?